“Just stretch it out” is the advice most people with back pain receive. Friends, family members, and internet videos offer the same guidance: grab your toes, hold it for 30 seconds, repeat.
But that oversimplified approach often makes back pain worse.
Here’s the clinical reality: stretching is valuable—when applied appropriately. Stretching a joint that has lost mobility can restore range of motion. Stretching a muscle that’s genuinely tight can reduce tension. But stretching a structure that’s already irritated by nerve compression can inflame it further. Stretching an already-hypermobile segment can create instability. And aggressive stretching when your nervous system is guarding can trigger pain that persists for hours.
The difference between therapeutic stretching and counterproductive stretching comes down to assessment. A registered physiotherapist evaluates your specific restriction—is it joint stiffness, muscle tightness, neural tension, or guarding?—and prescribes stretches that address that exact problem. This clinical guide walks you through the framework that works.
Why Your Stretching Has Failed Before
You’ve probably stretched your lower back. Maybe it felt good immediately. Maybe you did aggressive stretching routines and made your pain worse. Maybe you felt temporary relief that returned hours later.
Here’s why stretching without proper assessment often disappoints:
You stretched when you should have mobilized. Your restriction might be a joint stiffness, not muscle tightness. A 30-second static stretch doesn’t restore joint mobility—only hands-on mobilization does. You felt the stretch, but nothing changed mechanically.
You stretched too aggressively too soon. Aggressive stretching when your nervous system is protecting an injured area triggers reflex guarding. Your muscles actually tighten further in response to aggressive stretch. You might feel relief for an hour, then pain returns worse than before.
You stretched the wrong structure. Your low back pain might come from hip tightness, not lumbar tightness. Aggressively stretching your hamstrings when the actual problem is psoas tightness does nothing. Or your low back pain might come from neural tension—in which case aggressive stretching irritates the nerve further.
You didn’t address the cause. Stretching provides temporary relief if you continue stretching forever, but it doesn’t restore the mechanical dysfunction creating the tightness. Without addressing why you’re tight—postural habits, muscular guarding, joint restriction—the tightness returns the moment you stop stretching.
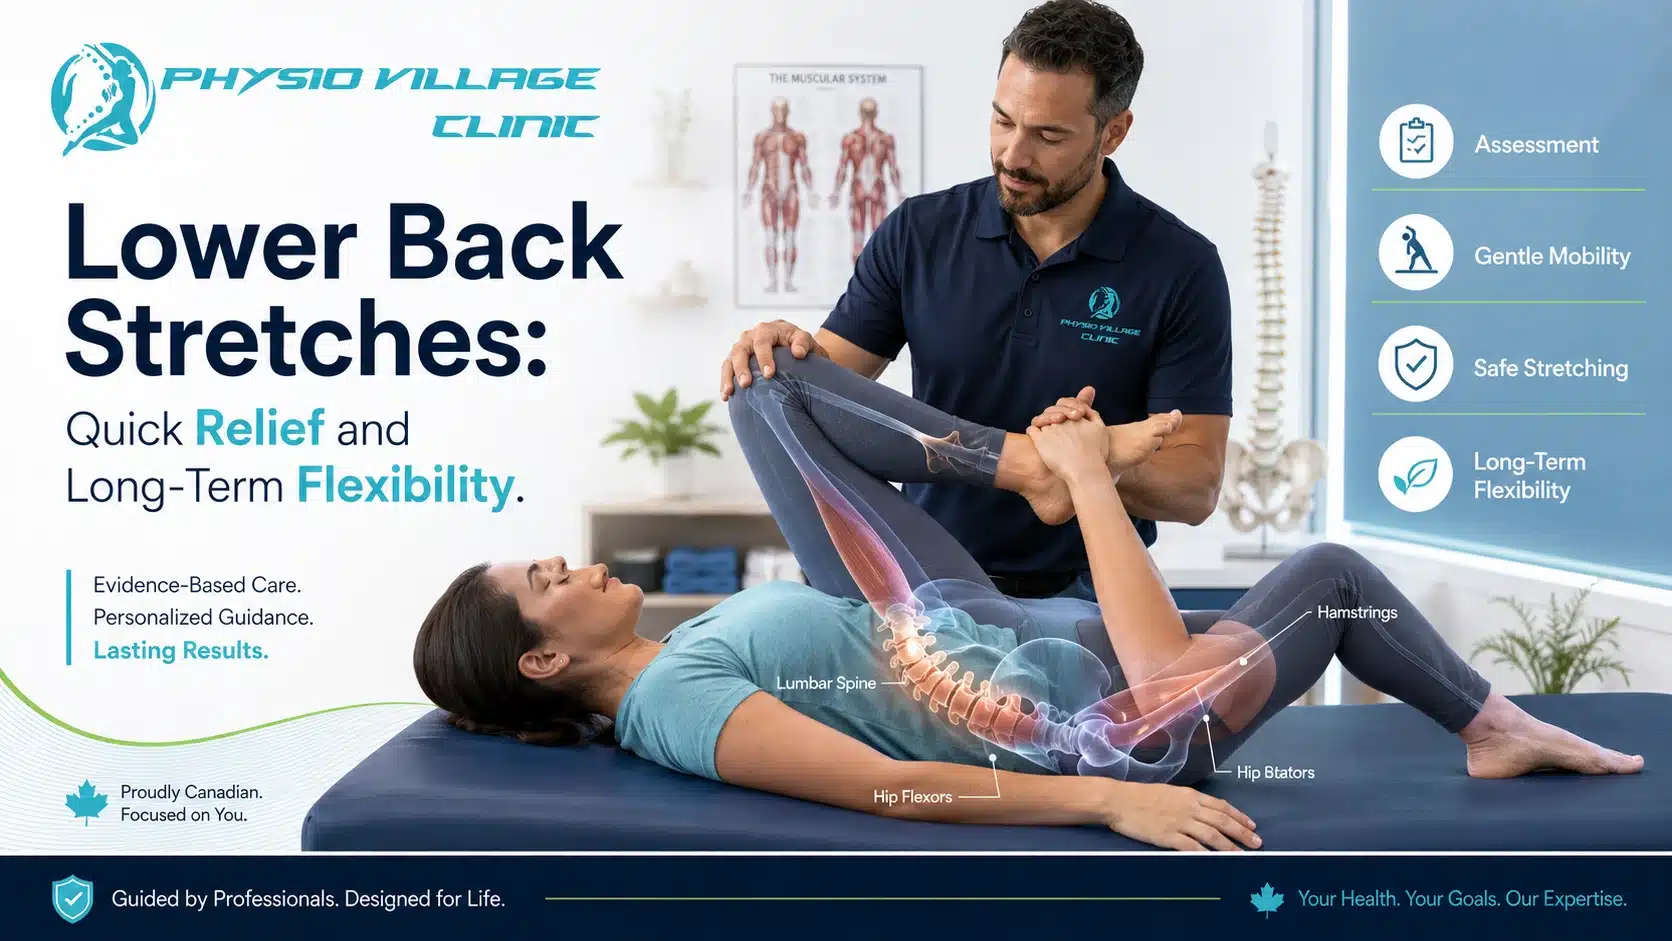
This is where manual therapy becomes essential. A physiotherapist assesses the mechanical cause of your restriction, applies hands-on techniques to address it, and then prescribes stretches that maintain and enhance the mobility gained through manual work.
The Manual Therapy Foundation: Why It Comes First
Before attempting stretches, understand what’s actually restricting your movement.
Joint Restriction: If your L4-L5 facet joint is restricted, aggressive stretching won’t help—only hands-on mobilization will. The stretch might feel good (stretching adjacent muscles), but it doesn’t address the actual restriction.
Muscular Guarding: If your nervous system has put your muscles into protective guarding, aggressive stretching triggers more guarding. Your muscles tighten further in response. You need gentle soft tissue release and nervous system calming before aggressive stretching becomes appropriate.
Neural Tension: If a nerve root is irritated or compressed, stretching can inflame it further. Aggressive hamstring stretching with neural tension can cause shooting pain, numbness, or tingling that persists for hours or days.
Postural Habits: If you spend 8 hours daily sitting in a rounded-spine position, your hip flexors shorten and your hip extensors lengthen and weaken. Stretching your hip extensors more won’t fix the problem—you need to change your postural habits and restore hip flexor extensibility through progressive loading.
A physiotherapist assesses which of these (or what combination) is creating your restriction, applies the appropriate manual techniques to address it, and then prescribes stretches that support the mechanical gains.
Here’s the sequence that works: Manual therapy → Gentle stretching → Progressive strengthening → Return to function.
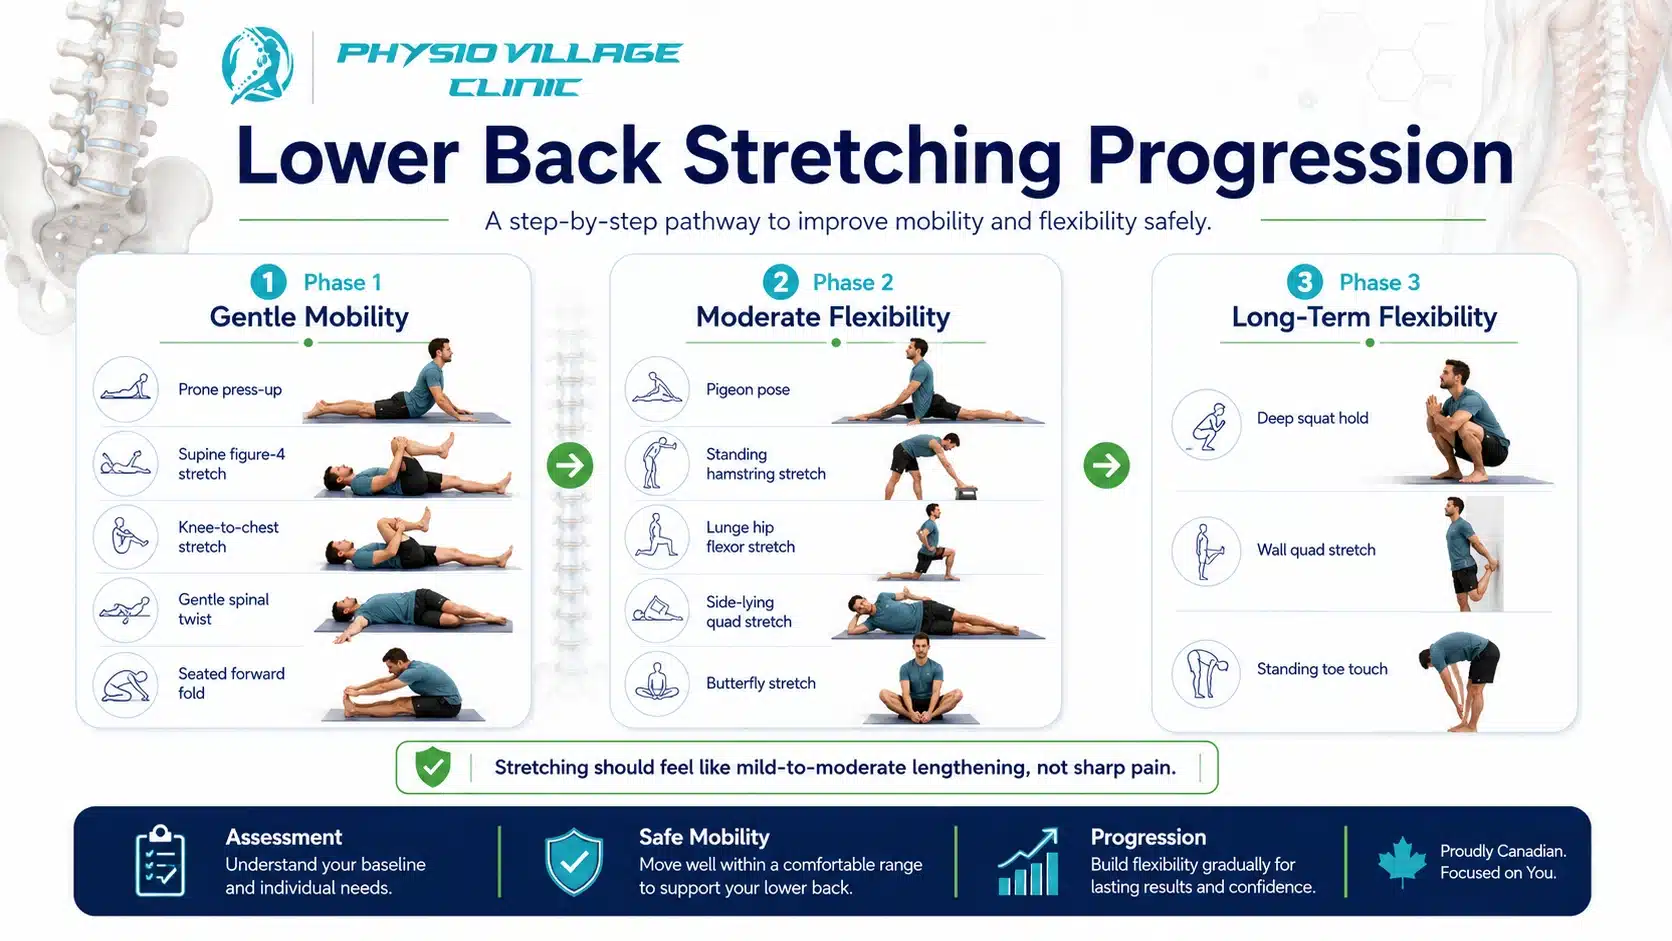
Gentle Lower Back Stretches: Phase 1 (Early Recovery)
These stretches are safe to perform even when your pain is acute. They’re gentle, respect your nervous system’s need for protection, and create the foundation for more aggressive stretching later.
Principle: Gentle stretches should feel like a mild sensation of lengthening, not pain. If you feel sharp pain, stop immediately. You’re stretching too aggressively.
Prone Press-Up (Sphinx Pose)
This stretch gently mobilizes your lumbar spine into extension—helpful if your pain worsens with forward bending (flexion).
Lie face-down with your forearms flat on the ground, elbows under your shoulders. Gently press your chest upward using your arms, allowing your lower back to extend. Your hips should remain on the ground.
Hold 15-20 seconds. Relax. Repeat 5 times.
What this does: Mobilizes your lumbar spine into extension, reduces anterior disc pressure if you have discogenic pain, and gently stretches your hip flexors and anterior abdominal wall.
When to avoid: If this increases your pain (especially if pain travels into your leg), stop immediately. You likely have extension-sensitive pain—this stretch isn’t appropriate for your current presentation.
Supine Figure-4 Stretch (Pigeon Pose Variation)
This stretch targets your piriformis and external hip rotators—muscles that become tight when your hip mechanics are compromised.
Lie on your back, knees bent, feet flat. Cross one ankle over the opposite knee, creating a “4” shape. Gently pull the bottom leg’s knee toward your chest, feeling a stretch across your buttock and outer hip.
Hold 20-30 seconds. Repeat 3 times per side.
What this does: Releases hip rotator tightness, which directly reduces lumbar stress. Your hip and lumbar spine mechanics are interconnected—hip tightness creates lumbar compensation.
Progression: Once you can perform this comfortably, pull your bottom leg’s knee closer to your chest for a deeper stretch.
Knee to Chest Stretch (Gentle)
This stretch gently mobilizes your lumbar spine into flexion—helpful if your pain worsens with backward bending (extension).
Lie on your back, knees bent, feet flat. Gently pull one knee toward your chest, keeping your bottom foot on the floor.
Hold 15-20 seconds. Relax. Repeat 3 times per side.
What this does: Gently mobilizes your lumbar spine into flexion, reduces posterior disc pressure if you have extension-sensitive pain, and stretches your gluteal muscles.
When to avoid: If this increases your pain, especially if pain travels into your leg, stop immediately. You likely have flexion-sensitive pain—this stretch isn’t appropriate for your current presentation.
Supine Spinal Twist (Gentle)
This stretch mobilizes your spine into rotation and releases latissimus dorsi and external oblique tension.
Lie on your back, knees bent, feet flat. Drop both knees to one side while keeping your shoulders flat on the ground. Turn your head to face the opposite direction.
Hold 20-30 seconds. Return to center. Repeat on the other side.
What this does: Mobilizes spinal rotation, releases lateral muscular tension, and gently stretches your hip rotators.
Seated Forward Fold (Gentle)
This stretch lengthens your posterior chain—hamstrings, calf muscles, and lower back extensors.
Sit upright with legs extended. Hinge at your hips (not your spine—this is critical), reaching your hands toward your feet. Only go as far as feels like mild lengthening, not pain.
Hold 20-30 seconds. Return to upright. Repeat 3 times.
What this does: Stretches hamstrings and calf muscles, gently mobilizes spinal flexion, and improves hip mobility. Many people find that when they stretch their hamstrings properly, their lower back pain actually decreases—because tight hamstrings create lumbar compensation.
Critical form tip: This stretch is performed with a hinge at the hips, not rounding at the spine. Imagine your hips have a hinge, and you’re rotating that hinge forward while keeping your spine relatively straight. This protects your lumbar spine while stretching your posterior chain effectively.
Moderate Stretches: Phase 2 (2-4 Weeks Into Recovery)
Once your pain has begun to resolve and your manual therapy has restored basic mobility, you’re ready for moderate-intensity stretches. These go deeper than Phase 1 stretches and challenge your flexibility more aggressively.
Principle: Moderate stretches should feel like mild-to-moderate tension in the target muscle, not pain. Hold them for 30-45 seconds.
Pigeon Pose (Deep Hip Opener)
This is the deeper version of the supine figure-4 stretch.
Start in a tabletop position (on hands and knees). Bring one knee forward toward the same-side wrist, lowering your hip down. Your front leg’s shin should be roughly parallel to your torso. Slowly lower your upper body down toward your front leg, feeling a deep stretch in your front hip.
Hold 45 seconds. Return to tabletop. Repeat on the other side.
What this does: Deeply stretches your piriformis and hip external rotators. This is critical for anyone with sciatica or sciatic-type symptoms—hip tightness is a primary cause.
Caution: If you feel sharp pain in your hip joint (not muscular stretch), reduce depth immediately. This stretch shouldn’t create joint pain.
Hamstring Stretch (Standing)
Stand upright. Place one heel on a elevated surface (chair, bench, step—at a comfortable height). Keep your standing leg straight. Hinge at the hips, reaching toward your elevated foot’s toes.
Hold 45 seconds. Relax. Repeat 3 times per side.
What this does: Aggressively stretches your hamstrings. Tight hamstrings are among the most common causes of lower back pain—they create compensatory lumbar flexion when you bend. Releasing hamstring tension directly reduces lumbar stress.
Progression: Once you can comfortably touch your toes with your elevated foot, you can deepen the stretch by placing your foot on a higher surface.
Lunge with Hip Flexor Stretch
From a standing position, take a large step forward with one leg. Lower your body down into a lunge position, back knee approaching the ground. Your front knee should be directly above your ankle.
In this position, you’re stretching your back leg’s hip flexors (psoas and rectus femoris). Hold 45 seconds. Stand up. Repeat on the other side.
What this does: Stretches your hip flexors, which become chronically shortened in anyone who sits extensively. Tight hip flexors create anterior pelvic tilt and lumbar hyperlordosis (excessive low back curve), which drives lower back pain. This stretch is critical for desk workers.
Side-Lying Quad Stretch
Lie on your side. Bend your top leg, bringing your heel toward your buttock. Gently pull your heel closer to your buttock, feeling a stretch down the front of your thigh.
Hold 45 seconds. Return to start. Repeat 3 times per side.
What this does: Stretches your quadriceps (specifically the rectus femoris), which attaches at your pelvis and influences your pelvic positioning. Quad tightness contributes to anterior pelvic tilt and lumbar compensation.
Butterfly Stretch
Sit upright with the soles of your feet together, knees splayed outward. Gently lean forward from your hips, feeling a stretch in your inner thighs and hip rotators.
Hold 45 seconds. Return to upright. Repeat 3 times.
What this does: Stretches your hip adductors and internal rotators. Many people overlook this area, but adductor tightness contributes to hip mechanics problems that create lumbar compensation.
Advanced Stretches: Phase 3 (4+ Weeks Into Recovery)
Once you’re pain-free and have adequate baseline flexibility, these advanced stretches can be incorporated into your maintenance routine.
Deep Squat Hold (Thoracic and Hip Mobility)
From standing, lower yourself into a squat position, feet wider than hip-width, heels on the ground. Your knees should track in the direction of your toes. Hold this position, feeling a deep stretch through your hips and lower back.
Hold 60 seconds. Rest. Repeat 2-3 times.
What this does: Stretches your hips deeply while mobilizing your spinal flexion and hip extension. This is ideal for anyone wanting to regain lost mobility.
Variation: Place your hands on the ground in front of you for additional lumbar flexion and hamstring stretch.
Wall Quad Stretch (Advanced)
Stand facing a wall. Bend one leg, bringing your heel toward your buttock. Grab your ankle and pull your heel closer, feeling an aggressive stretch down the front of your thigh.
Hold 60 seconds. Relax. Repeat 2-3 times per side.
What this does: Advanced quadriceps stretch that goes deeper than the side-lying version.
Standing Toe Touches
Stand upright, feet together. Slowly fold forward from your hips, allowing gravity to stretch your entire posterior chain—hamstrings, calf muscles, lower back extensors.
Hold 60 seconds. Relax. Repeat 3-4 times.
What this does: Aggressive stretch of your entire posterior chain. This should only be performed once you’ve built adequate flexibility through Phases 1 and 2 stretching.
Stretches to AVOID if You Have Lower Back Pain
Aggressive Sit-and-Reach (Full Spinal Flexion)
Don’t aggressively round your spine forward and hold. This creates excessive spinal flexion, which can worsen discogenic pain and increase neural tension if you have a disc protrusion with nerve involvement.
Instead: Use the modified seated forward fold from Phase 1—hip hinge rather than spinal rounding.
Bilateral Straight-Leg Raises
Don’t perform both-leg raises while lying on your back. This creates excessive lumbar lordosis (increased curve), which aggravates facet joints and can worsen lower back pain.
Instead: Use the dead bug or single-leg raises that maintain core engagement.
Aggressive Hyperextension Stretches
Don’t aggressively extend your spine backward, holding your ribs with your hands and arching backward maximally. This can worsen extension-sensitive pain and create facet joint irritation.
Instead: Use gentle prone press-ups that extend your spine gradually and controlledally.
Back Bends Without Breathing
Don’t perform spinal stretches while holding your breath. Breath holding creates abdominal pressure and spinal guarding. Always breathe slowly and deeply during stretching.
The Stretching Protocol That Works
Timing: Never stretch immediately after waking (your discs are hydrated and less resilient). Wait 30 minutes post-waking. Evening stretching is ideal—your muscles are warm and your nervous system is calmer.
Frequency:
- Phase 1 stretches: Daily, ideally 2x daily (morning and evening)
- Phase 2 stretches: 5-6x weekly once you’ve transitioned from Phase 1
- Phase 3 stretches: 3-4x weekly as maintenance once you’re pain-free
Duration: Hold each stretch for the recommended time. Don’t bounce or pulse—static stretching only. Bouncing activates a reflex that causes muscles to tighten further.
Temperature: Your muscles stretch better when warm. Perform stretches after light activity (walking, gentle movement) or use a heating pad for 5-10 minutes before stretching.
Breathing: Breathe slowly and deeply during stretches. Breath holding creates tension. Exhale into the stretch—many people find they naturally deepen the stretch when exhaling.
Progression: Progress from Phase 1 to Phase 2 only after 2-3 weeks without pain during stretching. Progress from Phase 2 to Phase 3 only after you’re consistently pain-free and have good baseline flexibility.
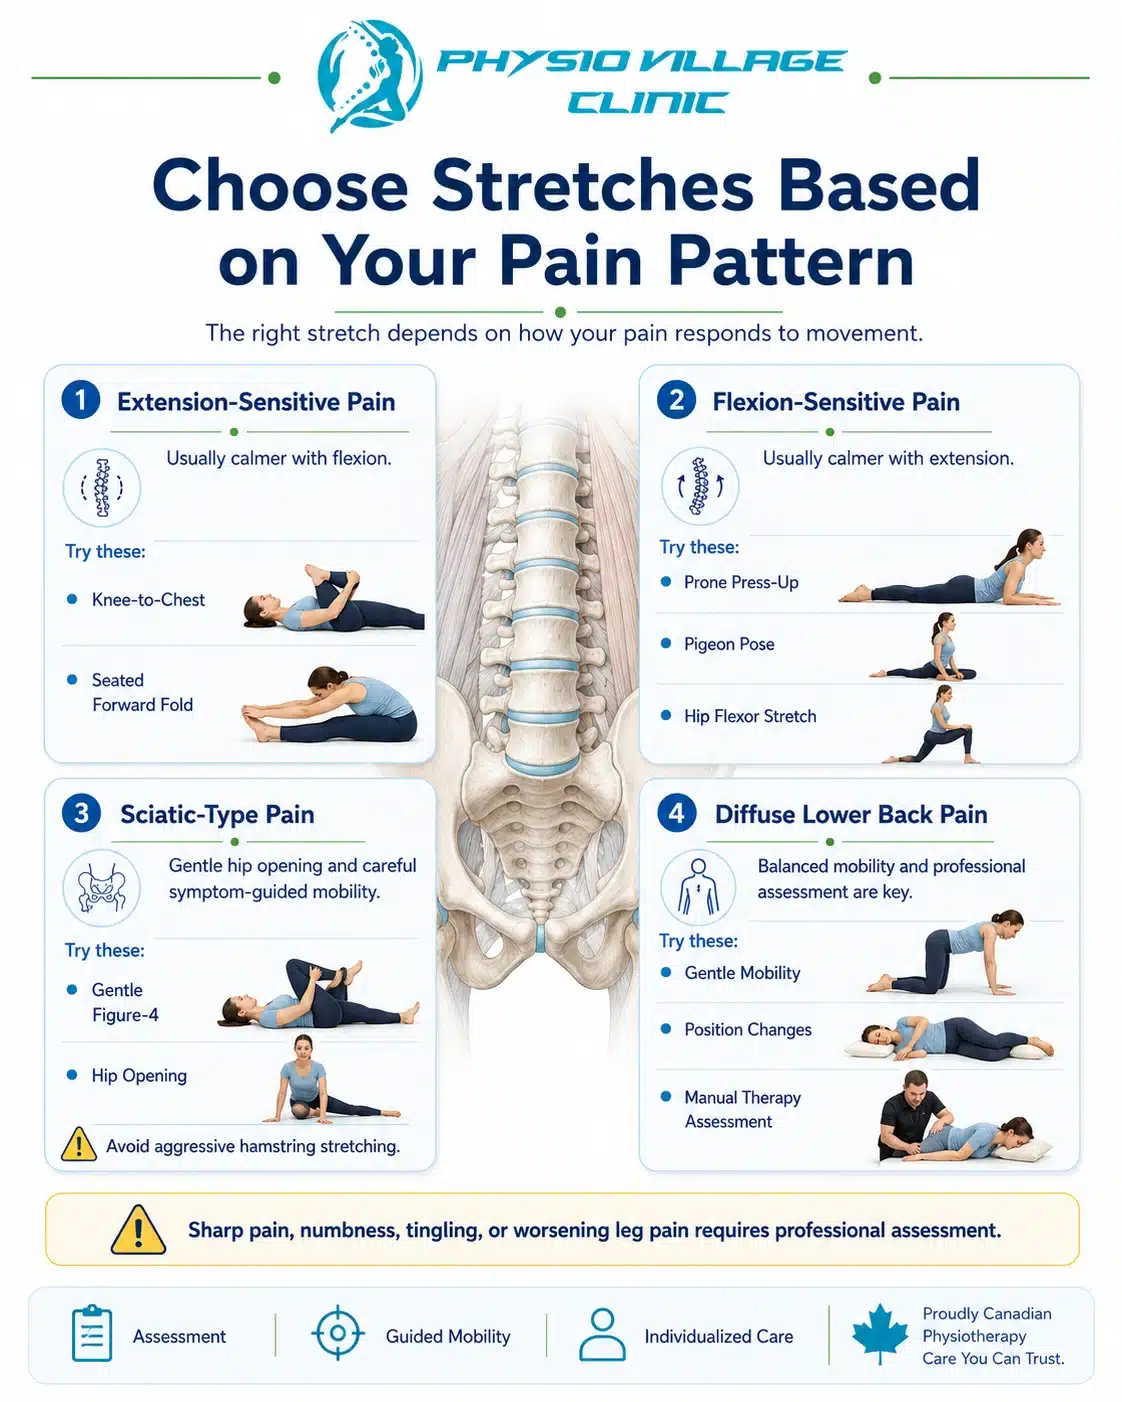
Stretching for Different Pain Patterns
Extension-Sensitive Pain (pain worsens backward bending):
Focus on flexion stretches: knee to chest, seated forward fold, deep squat hold. Avoid or minimize extension stretches initially (prone press-ups). As your pain resolves, you can gradually reintroduce extension stretches to restore balanced mobility.
Flexion-Sensitive Pain (pain worsens forward bending):
Focus on extension and hip opening stretches: gentle prone press-ups, pigeon pose, lunge with hip flexor stretch. Avoid aggressive flexion stretches until pain has resolved. As pain improves, cautiously reintroduce flexion stretches.
Sciatic-Type Pain (radiating into leg):
Focus on hip opening stretches, particularly pigeon pose, and gentle neural mobilization. Avoid aggressive hamstring stretches initially—you might be dealing with neural tension rather than muscle tightness. As pain centralizes and neural tension normalizes, progress to hamstring stretching.
Diffuse Pain (entire lower back region):
Perform a balanced mix of stretches—some flexion, some extension, hip opening. Avoid aggressive stretches initially. Gentle stretching, combined with manual therapy, usually resolves diffuse pain within 2-3 weeks.
Stretching Myths Debunked
Myth 1: You should feel intense pain during stretching.
False. Intense pain indicates you’re stretching too aggressively. You’re triggering protective guarding, which is counterproductive. Proper stretching creates mild-to-moderate sensation, not pain.
Myth 2: You should hold stretches for 60+ seconds.
Partially false. 60-90 seconds works, but research shows 30-45 seconds is sufficient for flexibility gains. Beyond 90 seconds provides diminishing returns. Quality matters more than duration.
Myth 3: Static stretching should be done before workouts.
False. Pre-workout stretching can reduce power output. Dynamic stretching (movement-based, not static holds) is better pre-workout. Static stretching is ideal post-workout or evening when you’re not about to perform.
Myth 4: Stretching prevents injury.
Partially true. Adequate flexibility contributes to injury prevention, but it’s not the only factor. Strength, motor control, and adequate recovery matter equally. Stretching alone doesn’t prevent injury.
Myth 5: Stretching should be painful to be effective.
False. Pain is a sign of tissue irritation, not beneficial stretching. Beneficial stretching creates mild-to-moderate tension, not pain. If you feel pain, reduce intensity.
Assessment Checkpoint: Is Stretching Working?
Every week during your recovery, assess your flexibility improvement:
Can you perform gentle stretches without pain? If yes, you’re progressing appropriately. If no, reduce intensity and return to your physiotherapist for reassessment.
Is your range of motion improving measurably? You should be able to reach slightly farther in forward folds, sit slightly deeper in lunges, or achieve slightly easier hip opening within 1-2 weeks. If flexibility isn’t improving, your stretching protocol needs adjustment.
Is your pain decreasing? Stretching combined with manual therapy should reduce your pain measurably. If pain is static or worsening, your stretching might be counterproductive—return to your physio for assessment.
Can you perform movements that previously hurt? Can you bend forward further? Sit easier? Stand longer? These functional improvements are better measures of success than flexibility alone.
If you’re not seeing these improvements, your stretching approach needs professional revision. Contact your physiotherapist for reassessment.
Integration With Manual Therapy and Exercise
Stretching works best as part of a comprehensive program:
Week 1-2: Manual therapy (to restore mobility and release guarding) + Phase 1 stretches + gentle activation exercises.
Week 3-6: Manual therapy (less frequent) + Phase 2 stretches + Phase 2 strengthening exercises.
Week 7+: Phase 2-3 stretches + Phase 3 strengthening + occasional manual therapy maintenance.
Ongoing: Phase 3 stretches (maintenance) performed 3-4x weekly + strength maintenance exercises + periodic manual therapy check-ins (monthly or as needed).
This integration is critical. Stretching alone doesn’t address mechanical dysfunction. Manual therapy alone doesn’t build flexibility or strength. The three together create complete recovery.
Real-World Stretching: When to Stretch During Your Day
At your desk: Every 60-90 minutes, perform one gentle hip opener and one gentle forward fold (5 minutes total). This breaks up postural stagnation that creates tightness.
After activity: Post-workout or after physical activity, perform 15-20 minutes of gentle to moderate stretching while your muscles are warm and your nervous system is active.
Before bed: Spend 10-15 minutes performing gentle to moderate stretches. This calms your nervous system, prepares your body for sleep, and maintains flexibility overnight.
Upon waking: Wait 30 minutes, then perform gentle stretches. This mobilizes your spine after prolonged static positioning while respecting your hydrated, less-resilient discs.
During work stress: When you notice tension building, perform one gentle hip opener or one gentle twist. This interrupts the tension cycle before it becomes problematic.
Questions to Ask Your Physiotherapist
- “Which stretches should I prioritize for my specific pain pattern?” (They should recommend specific stretches for your assessment findings, not generic routines.)
- “When should I progress from Phase 1 to Phase 2 stretching?” (You shouldn’t decide—your physio should based on pain and flexibility assessment.)
- “Are there any stretches I should avoid with my condition?” (Good clinicians always identify contraindicated stretches.)
- “How do I know if I’m stretching correctly?” (They should watch you perform stretches and correct form issues.)
Key Takeaways: Your Stretching Blueprint
Stretching is valuable—when applied appropriately. Manual therapy must precede aggressive stretching to address underlying mechanical dysfunction. Progressive stretching protocols (Phase 1 → Phase 2 → Phase 3) work better than random stretching.
Stretching should feel like mild-to-moderate lengthening, never pain. Your pain pattern (extension-sensitive, flexion-sensitive, sciatic) determines which stretches are appropriate. Consistency matters—stretching 3-5x weekly beats random stretching sporadically.
Stretching combined with manual therapy and exercise creates lasting flexibility. Stretching alone creates temporary flexibility that returns when you stop stretching.
Clinical Action Plan
This week: Contact Physio Village for assessment. Don’t start aggressive stretching until a physiotherapist has identified your specific restriction pattern.
Your assessment: Your physio performs hands-on mobilization, assesses your specific pain pattern and restrictions, and prescribes Phase 1 stretches appropriate for your condition.
Weeks 1-2: Perform Phase 1 stretches daily as prescribed. Your physio continues manual therapy 2-3x weekly.
Weeks 3-4: Progress to Phase 2 stretches as your pain resolves and mobility improves. Manual therapy reduces to 1-2x weekly.
Weeks 5-8: Advance to Phase 3 stretches as tolerated. Manual therapy becomes occasional (every 2-3 weeks).
Ongoing: Maintain Phase 2-3 stretches 3-4x weekly indefinitely. Perform occasional stretching maintenance to preserve flexibility gains.
Connect With Our Clinical Team
Do you know someone struggling with lower back pain who’s been aggressively stretching without relief? Share this clinical guide. Aggressive stretching without proper assessment often makes pain worse, not better.
Try this simple stretching assessment: Stand upright and slowly fold forward, hanging your arms down. Note how far you can reach. Come back to standing. Now try the gentle knee-to-chest stretch three times. Stand and fold forward again—most people can reach slightly farther after this single stretch. This demonstrates how proper stretching technique creates progressive mobility gains.
Book Your Assessment
Oakville Clinic: Book Oakville Clinic
Brampton Clinic: Book Brampton Clinic
Your lower back pain requires assessment before stretching. Let a registered physiotherapist identify your specific restriction pattern and guide your stretching progression from Phase 1 through long-term flexibility maintenance.