Back exercises alone don’t fix back pain. Let’s be direct about that from the start.
Most fitness content presents exercise as the primary solution. But here’s what clinical experience shows: prescribing back exercises to someone with a restricted facet joint, a guarded multifidus, or impaired nerve mobility without first addressing those mechanical dysfunctions is like trying to build strength on a broken foundation. The exercise itself becomes uncomfortable, progress stalls, and people abandon the routine convinced they’re “not a back person.”
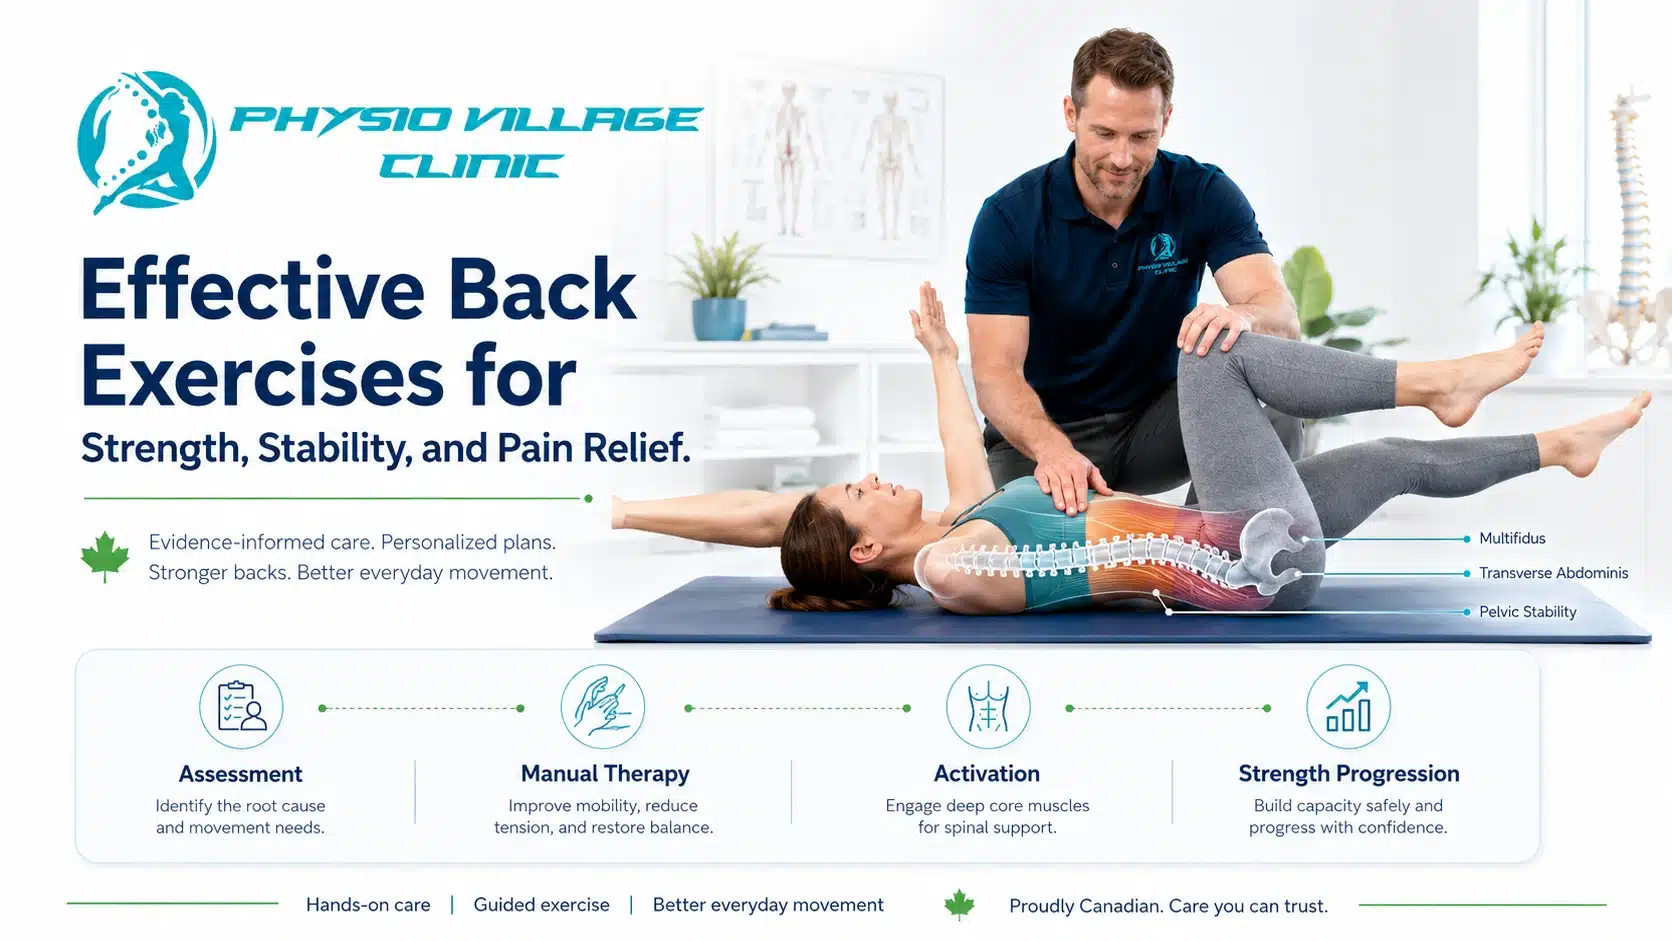
The truth is more nuanced. Manual therapy must precede and inform intelligent back exercise programming. A registered physiotherapist assesses your specific mechanical problem, applies hands-on mobilization to restore normal movement, and then prescribes exercise that your body can actually tolerate and progress through.
This clinical guide walks you through the exercise framework that works—not generic fitness routines, but progression-based therapeutic exercises informed by real biomechanical assessment.
Why Your Back Exercises Have Failed Before
You’ve probably tried back exercises at some point. Maybe you did crunches. Maybe you downloaded a “core” routine. Maybe you went to the gym and tried to “strengthen your back.” And maybe they didn’t work, or they made your pain worse.
Here’s why: without proper assessment and manual therapy foundation, exercise prescription is essentially guessing.
Common mistakes:
Exercise prescribed without identifying your specific dysfunction often aggravates the exact structure causing your pain. Someone with facet irritation doing repeated spinal extension exercises can drive pain upward, not toward recovery. Someone with a disc bulge and neural tension doing aggressive hamstring stretches can inflame the nerve further.
You need a physiotherapist to assess which muscles are actually weak versus which are overactive and guarded. These require opposite interventions. An overactive erector spinae doesn’t need more strengthening—it needs release and motor retraining. Your deep transverse abdominis might be the true weakness, but it won’t activate if your superficial muscles remain guarded.
Manual therapy solves this by releasing the guarded muscles and restoring neural signalling. Then exercise becomes effective.
Manual Therapy Foundation: Why It Comes First
Before attempting even the gentlest back exercises, your musculoskeletal system needs several things:

Segmental mobility: Your lumbar spine has five vertebrae. Each segment should move independently. When one segment becomes restricted—due to joint stiffness, muscular guarding, or fascial adhesion—the segments above and below compensate. This creates asymmetrical loading and pain patterns.
A registered physiotherapist uses hands-on mobilization to restore segmental mobility. They can feel which segments are restricted and which are moving excessively. Once segmental mobility is restored, exercise becomes tolerable and effective.
Muscular release: Chronic guarding creates a pain cycle. Your muscles tighten to protect an injured area. If that guarding isn’t released, it persists even after the original injury heals. Soft tissue release and myofascial techniques break this cycle.
Neural mobilization: If a nerve root is irritated or compressed, aggressive stretching can inflame it further. A trained physiotherapist assesses neural tension through specific maneuvers and applies gentle mobilization techniques that restore nerve mobility without aggravation. Only after neural tension is normalized should you progress to stretching.
Proprioceptive reset: Manual therapy provides rich proprioceptive input. When a physiotherapist mobilizes your spine and applies soft tissue techniques, they’re teaching your nervous system what normal movement feels like. This neural reset is foundational for effective exercise.
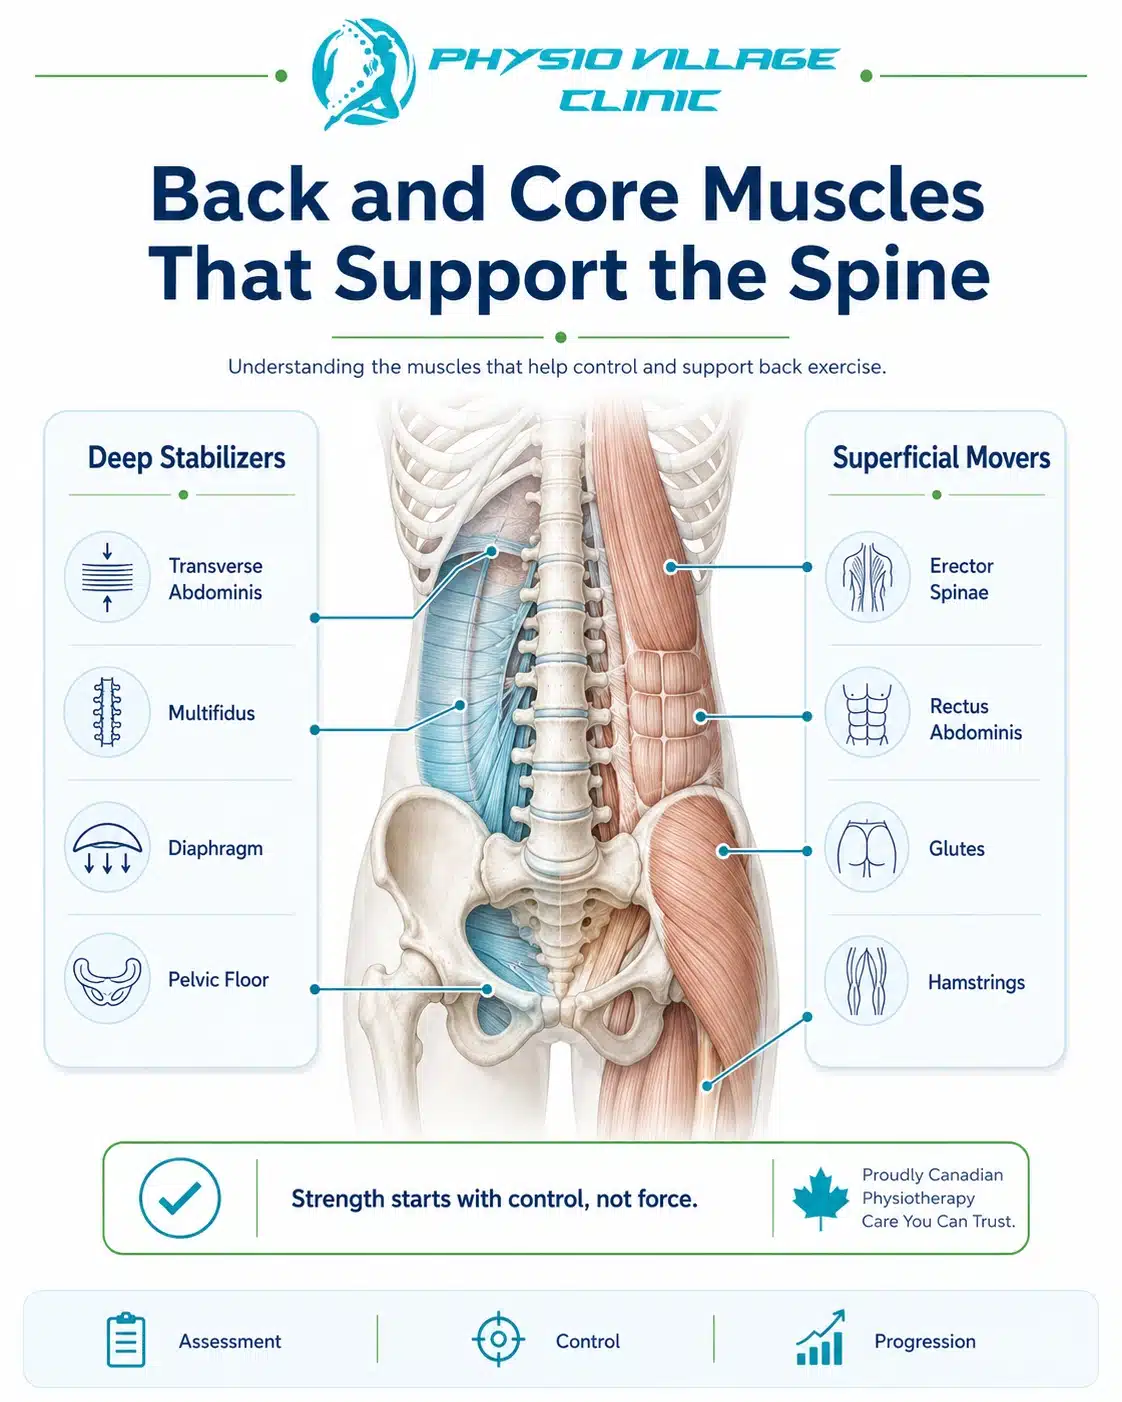
The Back Muscles: What You’re Actually Strengthening
Most people use “back exercises” to mean exercises that target their low back. But your back has layers—superficial muscles and deep stabilizers work completely differently.
The Deep Stabilizers: Your True Core
These muscles rarely show on Instagram. They don’t create visual definition. But they’re absolutely critical for spine stability and pain prevention.
Transverse abdominis (TA): This is your deepest abdominal layer, running horizontally across your trunk. When it activates, it increases intra-abdominal pressure, creating a hydraulic support for your lumbar spine. Many people with back pain have TA inhibition—their deep core doesn’t activate properly due to pain, poor motor control, or neural dampening.
Multifidus: These small muscles run along your spine, connecting adjacent vertebrae. They stabilize individual spinal segments and prevent excessive motion. Multifidus atrophy is seen in nearly all chronic back pain patients. When you restore its activation through targeted exercise, pain often resolves remarkably.
Diaphragm and pelvic floor: These are part of your “canister” stability system. Your diaphragm should move downward during inhalation, creating pressure that supports your lumbar spine. Poor breathing patterns (typically chest-breathing instead of diaphragmatic breathing) compromise this support system. Similarly, pelvic floor dysfunction affects overall spinal stability.
The Superficial Movers: Essential but Insufficient
Your rectus abdominis (six-pack muscle) and erector spinae run along your spine. These create movement and provide some stability, but they fatigue quickly if your deep stabilizers aren’t working. When people complain of “back fatigue,” they often mean their superficial muscles are exhausted because the deep stabilizers have failed to provide foundational support.
Strengthening superficial muscles without restoring deep stability is like reinforcing a house’s walls when the foundation is cracked.
Best Back Exercises: The Progressive Framework
All of these exercises should feel easy when performed correctly. If you feel strain, sharp pain, or excessive fatigue, you’re either doing the movement incorrectly or your foundation isn’t ready. Return to manual therapy before progressing.
Phase 1: Activation and Motor Control (Weeks 1-2)
These exercises are about finding your deep muscles, not about fatigue or rep count. You’re teaching your nervous system to activate muscles that may be neurally inhibited.
Transverse Abdominis Activation (Supine)
Lie on your back with knees bent, feet flat. Place one hand on your lower abdomen. Without moving your pelvis or ribs, gently draw your lower abdomen inward—imagine tightening a corset. You should feel your abdominal muscles engage under your hand, and your pelvis should remain completely still.
Hold this gentle contraction for 5-10 seconds. Rest. Repeat 8-10 times.
This doesn’t look like much, but you’re restoring neural pathways to your deep core. Do this daily, multiple times per day. Once you can activate this easily without holding your breath, progress.
Multifidus Activation (Prone)
Lie face-down with a pillow under your forehead. Place your hands under your shoulders. Without pressing with your arms or lifting your chest, gently contract the muscles alongside your spine. You should feel a subtle contraction running up both sides of your lower back.
Hold 5 seconds. Relax. Repeat 10 times.
Many people can’t feel this muscle at all initially—that’s how inhibited it is. Persistence pays. Within 2-3 weeks of daily practice, you’ll feel activation easily.
Diaphragmatic Breathing (Seated or Supine)
Place one hand on your chest, one on your belly. Breathe in slowly through your nose for a 4-count, allowing your belly to expand outward. Your chest hand should remain relatively still. Exhale slowly for 6-count, feeling your belly draw inward.
This is foundational. Most people with back pain have reverted to chest-breathing, which doesn’t support spinal stability. Retraining diaphragmatic breathing takes 2-3 weeks of daily practice, but it profoundly improves spinal mechanics.
Perform this 10 times, 2-3 times daily.
Phase 2: Stability and Integrated Control (Weeks 3-6)
Once you can activate your deep muscles easily, you’re ready to challenge them while maintaining that activation. The key principle: you’re adding demand while maintaining control.
Dead Bug Progression
Lie on your back, knees bent, feet flat. Draw your lower abdomen inward (activating TA). Slowly lift one foot off the ground 2 inches, then lower it. Alternate sides.
Perform 10 repetitions per side, maintaining TA contraction throughout. If your lower back starts to arch, you’ve lost TA activation—stop and reset.
Progress to: lifting opposite arm and leg simultaneously, maintaining deep core activation.
Bridge Hold
Lie on your back, knees bent, feet flat hip-width apart. Contract your glutes and lift your hips until your body forms a straight line from knees to shoulders. Hold this position while maintaining core contraction.
Hold 20-30 seconds, rest, repeat 5 times.
This teaches your posterior chain (glutes, hamstrings, spinal stabilizers) to work together. The key: your glutes should do the work, not your low back. If you feel lower back strain, you’re overarching—lower your hips slightly.
Quadruped Limb Raise
Start on hands and knees. Engage your core (draw abdomen inward). Slowly extend one leg straight back, hip height, without rotating your pelvis. Hold 2 seconds, lower, repeat.
Perform 10 per side. This teaches your deep stabilizers to control movement through different planes.
Prone Plank Progression (Beginner)
Start on forearms and knees. Engage your core. Hold a position where your body forms a straight line from knees to head, with no sagging at the hips.
Hold 15-20 seconds. Rest, repeat 5 times.
Progress to full plank (on hands) once you can maintain proper form. The goal is never maximum duration—it’s maintaining perfect form. A 20-second plank with proper activation beats a 60-second plank with poor form.
Phase 3: Functional Strength and Return to Activity (Weeks 7+)
Once you can maintain stability through basic movements, you’re ready for exercises that replicate real-world demands.
Bird Dog Hold and Reach
Start on hands and knees, core engaged. Extend opposite arm and leg. Once balanced, perform small circles with your extended arm while maintaining hip stability.
8-10 circles, switch sides, repeat 3 times.
This teaches your stabilizers to control movement while your limbs move—exactly what life requires.
Single-Leg Deadlift (With Support)
Stand facing a wall or chair for light support. Engage your core. Shift weight to one leg, hinge at the hip, reaching your opposite hand toward the floor. Your moving leg stays extended behind you for balance.
Stand back up, return to start. Repeat 8-10 per side.
This teaches your spinal stabilizers to control movement under load while your body is in motion—a prerequisite for returning to lifting, sports, or heavy daily activity.
Farmer’s Carry
Hold a moderate weight (dumbbell or kettlebell) in one hand. Stand upright with core engaged. Walk for 30-40 meters, maintaining perfect posture.
Perform 3 rounds per side.
This is deceptively difficult and incredibly functional. Your core must stabilize against rotational forces while you move—exactly the demand of real life.
Back Exercises for Specific Pain Patterns
Your specific back exercise progression depends on your mechanical problem. This is where assessment matters.
If your pain is centralized (center of low back, worse with forward bending):
You likely have discogenic pain or facet irritation. Focus on exercises that improve extension mobility and core stability—bridges, bird dogs, and prone planks. Avoid aggressive flexion stretching initially. Once manual therapy has reduced your pain, you can reintroduce flexion with controlled progression.
If your pain is lateral (one side only):
You likely have unilateral facet irritation or muscular guarding. Your exercises should emphasize contralateral activation (working the opposite side to rebalance). Focus on single-leg deadlifts and asymmetrical farmer’s carries. Manual therapy should address the restriction on the painful side before you load it heavily.
If you have radiating pain into your leg:
You have potential nerve root involvement. Aggressive stretching can inflame the nerve further. After manual therapy has normalized neural tension, progress carefully to gentle nerve mobilization exercises. Only after pain has centralized should you return to full strengthening.
If your pain is diffuse (entire back fatigues easily):
You likely have deep core inhibition. Your superficial muscles are compensating, creating widespread fatigue. Focus on Phase 1 activation exercises (TA, multifidus, diaphragmatic breathing) for 2-3 weeks before progressing to strength work.
The Integration: How Manual Therapy and Exercise Work Together
Here’s the clinical reality: manual therapy and exercise aren’t competing approaches. They’re sequential and complementary.
Week 1-2 (Manual Therapy Focus):
Your physio performs hands-on mobilization to restore segmental mobility, releases muscular guarding, and normalizes neural tension. You perform basic activation exercises at home. Your pain reduces substantially.
Week 3-6 (Transitional Phase):
Manual therapy continues but at reduced frequency (moving from 3x weekly to 2x weekly). The focus shifts to exercise progression and motor retraining. Your physio performs hands-on work to address residual restrictions, then watches you perform exercises, correcting form and challenging your stability.
Week 7+ (Exercise Independence):
Manual therapy becomes occasional (1x every 2-3 weeks, then monthly). You’re performing prescribed exercises independently, progressing as tolerated. Your physio provides periodic assessment to ensure you’re progressing optimally and to address any plateaus.
This is the framework that works. Manual therapy jumpstarts recovery. Exercise builds durable strength and prevents recurrence.
Avoiding Common Exercise Mistakes
Mistake 1: Too Much Volume Too Soon
Performing 50 reps of an exercise to “build muscle” guarantees poor form and fatigue. Instead: perform 8-10 reps with perfect form. Quality over quantity. Your nervous system learns better movement patterns through precision, not volume.
Mistake 2: Pushing Through Sharp Pain
There’s a difference between muscular effort and joint pain. Muscular effort is acceptable during strengthening. Sharp, stabbing pain is not. If an exercise creates sharp pain, stop and return to the previous phase. Your body is telling you it’s not ready.
Mistake 3: Skipping the Foundations
People want to jump straight to “real” exercises. But if your deep core is inhibited and your joints are restricted, jumping to advanced progressions is pointless. Spend 2-3 weeks on Phase 1 activation. It seems simple, but it’s foundational.
Mistake 4: Doing Random Exercises Without Progression
Following a YouTube routine that addresses nothing specific to your problem wastes time. Work with your physio to identify 4-5 exercises that address your specific dysfunction, and progress them systematically. This beats doing 20 random exercises poorly.
Mistake 5: Exercising With Poor Posture
If you spend 22 hours per day slouched at a desk, your 2 hours of exercise won’t create lasting change. Postural awareness matters. Throughout your day, maintain neutral spine. This reinforces what your exercises are teaching.
Assessment Checkpoint: Are You Progressing Correctly?
Every 2 weeks, your physio should assess whether you’re ready to progress. Here’s what correct progression looks like:
- Reduced pain: Your pain should decrease measurably. Pain intensity might drop 30-50% by week 4, another 30-50% by week 8.
- Improved function: Activities that hurt initially (walking, bending, lifting) should become easier and less painful.
- Better movement quality: You should move with less guarding, more ease. This is palpable and visible.
- Exercise tolerance: You should tolerate your prescribed exercises without pain or excessive fatigue. If you’re struggling, you’re not ready to progress.
If you’re not seeing these changes after 4 weeks, your assessment or exercise prescription needs revision. Return to your physio for reassessment.
Advanced Back Exercises: When You’re Ready
This section is only relevant after you’ve completed Phases 1 and 2 and experienced significant pain reduction.
Once you’re pain-free, you can progress to more challenging strengthening:
Resistance Band Rows: Develop pulling strength for upper back and lats.
Barbell or Dumbbell Deadlifts: Heavy compound movement that loads your posterior chain maximally.
Rotational Exercises: Pallof presses and cable rotations train your core’s ability to resist rotation under load.
Sport-Specific Training: Return to your sport or activity with progressive demands.
But here’s the critical point: these advanced exercises come after you’ve mastered the foundation. You’re building a house. The foundation is boring and invisible, but it’s absolutely necessary.
Lifestyle Factors That Support Your Exercise Progression
Sleep: Your muscles rebuild during sleep. Chronic poor sleep inhibits recovery. Aim for 7-9 hours nightly. Sleep position matters—side sleepers should use a pillow between knees; back sleepers should use a pillow under knees.
Hydration: Your intervertebral discs are largely water. Dehydration creates disc stiffness and pain. Drink 2-3 litres of water daily.
Nutrition: Your muscles need protein to repair. Aim for 0.8-1 gram per pound of body weight daily. Your joints need adequate micronutrients—vitamin D, magnesium, omega-3s. These aren’t fancy; they’re foundational.
Movement variability: Don’t just do prescribed exercises. Move throughout the day. Walk, stretch, change positions frequently. Your spine evolved for variable movement, not static positions.
Stress management: Chronic stress creates muscular guarding. Your back exercises work better when you’re managing stress through practices like meditation, breathing work, or time in nature.
Questions to Ask Your Physiotherapist
- “Based on my assessment, which specific muscles are weak versus guarded?” (They should answer specifically: “Your TA is inhibited; your erector spinae is overactive.”)
- “How should I modify these exercises if they create pain?” (They should give you regression strategies, not tell you to push through.)
- “When should I progress to the next phase?” (You shouldn’t decide this—your physio should based on objective assessment.)
- “What happens when I complete this program? How do I maintain my gains?” (Good clinicians teach you the exercises you’ll continue indefinitely.)
Key Takeaways: Your Exercise Blueprint
Back exercises work—but only when they’re built on a proper foundation. Manual therapy restores mobility, releases guarding, and resets your nervous system. Exercise builds strength and prevents recurrence. Together, they’re powerful.
Your progression should be systematic: Phase 1 (activation and motor control), Phase 2 (stability), Phase 3 (functional strength). Each phase typically lasts 2-4 weeks. You should see measurable improvement every 2 weeks.
Generic exercises miss your specific dysfunction. Work with a registered physiotherapist to identify your problem and progress your exercise plan accordingly.
Clinical Action Plan
This week: Contact Physio Village for assessment. If you’ve been experiencing back pain, manual therapy must precede exercise progression.
Your assessment appointment: Your physio identifies your specific dysfunction and teaches you Phase 1 activation exercises. You’ll perform these daily.
Weeks 2-3: After initial manual therapy and pain reduction, you’re ready for Phase 2 stability exercises. Your physio assesses whether you’re maintaining proper activation and progresses your routine.
Weeks 4-8: You progress to more demanding exercises as your body demonstrates improved stability and control.
Weeks 9+: You transition to independent maintenance, with occasional physio visits to reassess and address any setbacks.
Connect With Our Clinical Team
Do you know someone struggling with back pain who’s been told to “just strengthen your core” without addressing their underlying mechanical dysfunction? Share this clinical guide. Strengthening without assessment is wasted effort.
Try this simple assessment: Stand upright with good posture. Can you engage your lower abdominal muscles (draw your belly inward) without holding your breath and without pelvic movement? If you can’t, your deep core activation is compromised—this is exactly what manual therapy and Phase 1 exercise address. Check weekly during your recovery—it’s your objective measure of neuromotor improvement.
Book Your Assessment
Oakville Clinic: Book Oakville Clinic
Brampton Clinic: Book Brampton Clinic
Your back exercises need a proper foundation. Let a registered physiotherapist assess your specific problem and guide your progression from activation through advanced strength work.